
You can easily use your Pi as a programming interface for micro:bit. The following assume you are running Rasbian and have been tested with the April 17 s/w release.
The 2 options described here are;
- mbed – this is an online c++ integrated development environment
- MicroPython – this is cut down version of Python, it is one of the ‘BBC blesssed’ coding langues for the micor:bit
mbed
The mbed platform is stable and really responsive on a P3, using Chrome.
- Connect your micro:bit to one of the Pi’s USB ports, the Pi will automatically recognize a new ‘removable medium’ has been inserted and offer to open it in file manager
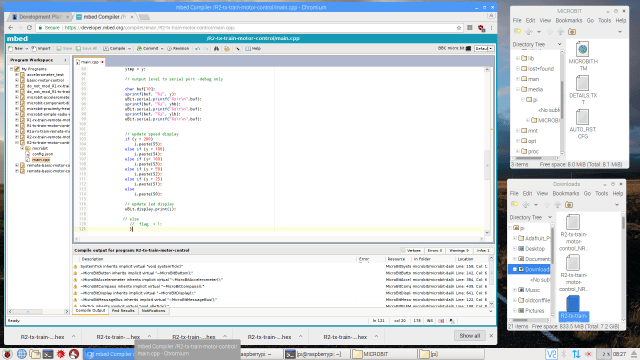
- click ‘ok’ and you should see a window like this

- next open the downloads folder in a new window with file manager

- Open Chrome a and navigate to the mbed site , if this is your first time using mbed follow the instructions to create an account – you will find micro:bit as a supported platform
- This is how I arrange the windows but it is down to personal preference
- There are numerous example programs you can try – start simple to get the feel of the mbed environment. One thing to note is that everything with mbed happens and is stored on the ‘cloud’ you cannot directly download source files to the Pi
- When you [successfully] compile an application the .hex file will be automatically placed in your ‘download’ folder – you should see it appear in the window you opened earlier
- To program the micro:bit simply drag the .hex file up to the micro:bit window and the micro:bit will automatically down load your complied code
- After a short delay the micro:bit window will close [ this is because the micro:bit resets having downloaded the code ]
- The micro:bit automatically runs the downloaded code
Serial
The micro:bit has a built in capability to send data to a ‘virtual’ serial port, this is very useful for debugging your code. Again you can use this capability easily with a Raspberry Pi
- The code to use the serial is covered in a number of places – for instance with the micro:bit run-time library’s , it also works with the Touch coding tool amongst others

- With the micro:bit connected to the Pi as described at the start, check which
/dev/node the micro:bit has been assigned to – by entering the following command in a terminal window -
dmesg|tail
- In the resulting output you are looking for the ‘ttyxxxx’ – where the ‘xxxx’ will vary, note this down – on my setup is came back as ‘ttyACM0’
- You then need to run a terminal emulation program, minicom is the most common and comes ready installed in Rasbian . you can also use ‘screen’ but will need to install that.
-
minicom -D /dev/ttyACM0
– remembering to change the ‘ACM0’ to match the result from dmesg test
– also the micro:bit is configured for 115200 baud operation minicom seems to default to this but you can check with the ‘-s’ option
- Now anything you output via the serial command will be shown in the terminal window – a real help with debugging, given the limited visual interface on the micro:bit
- If you are finding the terminal connection unstable, try slowing your code a little
MicroPython
You can use the ‘mu’ tool to program your micro:bit in MicroPython, the big advantage of the mu tool over the webbased tools is that you can use it ‘offline’.
The quickest way to install mu on a raspberry Pi, is to type the following from a terminal window
sudo apt-get update
sudo apt-get install mu
For more information on mu follow this link
However currently the version in the Rasbian respository is somewhat out of date. This is not a problem if you are just trying it out, but some command ( radio and speech ) are not supported. You can get the latest version from the mu github site. There are various instructions on web on how to install it, this worked for me ..
- open a terminal window
- if you have previuosly installed mu from apt-get remove it
sudo apt-get remove mu
- clone the current release from git hub and install
git clone https://github.com/mu-editor/mu
cd mu
sudo python3 setup.py install
- On paper this is all you should have to do, but I found there were a couple of modules missing I had to install additionally
sudo apt-get install pyflakes
pip3 install pycodestyle
*** STRETCH UPDATE ***
As of 20/8/17 the latest Stretch update for the RPi is still loading a very old version of mu. to get the latest version follow the instructions above with the additional extra bit below
sudo apt-get install python3-pyqt5 python3-pyqt5.qsci python3-pyqt5.qtserialport python3-sip
I am not sure all are needed but it worked for me !
I am guessing it breaks a few rules but I found the following also works !
(This has the advantage that it adds mu to the programming menu for you)
git clone https://github.com/mu-editor/mu
cd mu
sudo python3 setup.py install
sudo apt-get install mu
Once installed start mu from a terminal window, the interface is easy to use, simply plug in your micro:bit into one of the USB ports and get coding. For details on the micro:bit implementation of MicroPython see this link
The main area I had to get used to was the error handling. If MicroPython encounters an error it will scroll a message across the LEDs advising the line number the error is in.
