USB LCD Display for the Raspberry PI

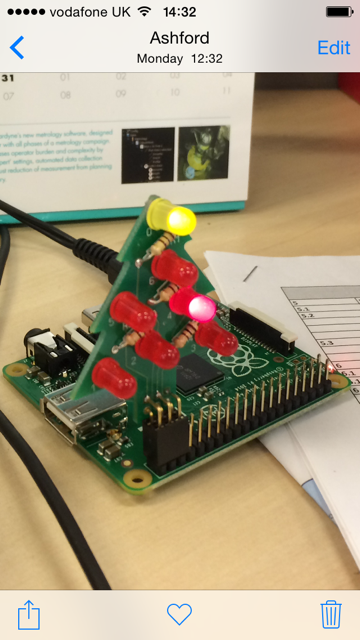
A number of people have asked me about the USB LCD display we hIMG_0319ad on our table at the
Raspberry Pi Birthday on Saturday, so I have pulled together the following details.

I found the display while looking for a way to package a LCD for a project at home. It comes complete – all you need is an USB lead to connect to the Rpi. While not cheap (appox $38 shipped from the US) it makes up for this in terms of simplicity – and that it comes ‘packaged’ in a L shaped stand.image3

To get the LCD up and running you just need to install ‘pyusb’, and ‘pylcdsysinfo.py’.

In basic text mode you have 6 lines of text in a range of about 15 colours ( you can apparently address over 200k but I struggle to see more than 15 different distinct colours). There is also the option to download 7 pictures to the LCD modules non volatile memoey, which can then be displayed anytime – there is an extra bit of s/w included on linked site which scales high res jpg’s down and uploads them.IMG_0308

The primary market for the display is as an add-on for gaming machines, which explains why a number of the inbuilt instructions do not make much sense for a RPi ! The actual module could be better put together, but looks fine from the front , which will be ok for most people.IMG_0318image2b

To me the great thing about the display is that no fiddling with the Rpi is needed to connect to it and start displaying ‘stuff’, accepting the cost this makes it an ideal display for kids to use

Display info Hardware Information

  • LCD: 2.8inch TFT LCD, resolution 320×240, 262k colours
  • mini-B USB 1.1 compliant connection  [ same as Rpi Power connection]
  • Flash memory 2Mb storing icons and images
  • PWM backlight control

Sourcing information:

Link to the Ebay store I purchased from

http://www.ebay.com/itm/USB-2-8-TFT-LCD-module-LCD-sys-info-display-temperature-fan-AIDA64-LCD-Smartie-/121004607232

Link to technical / software

http://coldtearselectronics.wikispaces.com/USB+LCD+-+LCD+System+info


48838838

Posted in Uncategorized | Tagged , | Leave a comment

Raspberry Pi Birthday – somewhat tired today

image1Great day at the Raspberry Pi Birthday event yesterday, good to be able to browse for Pi bits, reminded me of attending electronics shows at Alexandra Palace  in the late 70s………

Party was fun, good beer, Pizza and cake, just what we needed at the end of long day.


image2And lots if interest in the Chicken Heater project, now just got to put it back together in the garden.

Watch out for the Raspberry Watchdog on Kickstarter in the coming weeks.

Posted in Uncategorized | Tagged , | Leave a comment

All packed up for the Raspberry PI Big Birthday Weekend

piBirth  Just finished packing for the Raspberry PI big weekend tomorrow. Mk2 Chicken Waterheater will be in the ‘show and tell’ area on Saturday, together with a few other bits I have been working on recently.

IMG_0296

Posted in Uncategorized | Tagged , | Leave a comment

Defrosting the Turkey

I have been working on an update to my IMG_0172
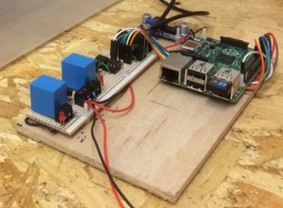
Raspberry Pi Chicken Water Heater project recently, replacing the analogue temperature sensors with DS18B20 digital Temperature Sensors. At the same time I have simplified the heater relay circuit, replacing the interposing relays with opto-isolators. FullSizeRenderThe final change has been to scrap the linear sub-regulator in favour of a switch mode device. The gap on board is for a Raspberry Pi battery backup circuit, I have been working on for a while.

To give it all a test before setting up outside I have set it up to monitor the turkey defrost, IMG_0172logging the temperatures and tweeting an update every hour ….

Posted in Uncategorized | Tagged , , | Leave a comment

Raspberry Pi A+ all set for Christmas

IMG_0161Going minimalist for decorations this year. Still not quite sure what I am going to do with my new A+ after Christmas but I am sure I will think of something !

There are lots of reviews for the A+ out there so not much value I can add here except for the following 2 points / warnings.

  • when running the initial setup the SD card I got an error essentially saying the installer did not recognise the A+, – this is a known issue just ignore it it will / may have already gone away
  • The USB port mechanically feels bit fragile, again a number of people have highlighted this.  This can be a particular issue with some USB Wifi adaptors which seem to have a thicker ‘tongue‘  which can force the mating part of the RPi USB out of alignment. Another way to look at it, is that the USB connector on the A+ feels cheaper than those on the B / B+

In conclusion, my one sentence summary  – Great cost effective board for embedded projects with minimal USB interface requirements, but if you are looking for a Raspberry Pi to experiment with / use in schools / with children, go for the B+ every time

The Christmas tree is an excellent result of a KickStarter project from www.pocketmoneytronics.co.uk which arrived last week

Posted in Uncategorized | Leave a comment

Great Laser Cutting Service

Taking a lateral look at my ongoing difficulty of finding decent enclosures for LCD displays (the thought of drilling lots of holes and filing to a neat finish fills me with deep despair)  I came across  a company called RazorLAB.

IMG_0058RazorLAB offers an on-line laser cutting and engraving service for what to me is a quite reasonable price, on a range of materials including ply and Acrylic. They suggest you plan for about a 3-4 week turnaround but I got mine back within the week.

I used ply basically because it was the cheaper than Acrylic, but look at the website for the full range of materials available. With ply you are left with some limited burn marks on the cut material but you should be able to sand these out in most cases.

Designs are created in Illustrator, CorelDRAW or Inksape. The latter is available to down load for free so it the obvious choice for try out. You can easily upload your design to check on cost – but note the initial pricing information does not include VAT or postage. There is also clear guidance on how to format your designs correctly for their ‘system’ accepts them. In simple terms once you make an allowance for the base material, the cost is driven by the laser cutting time, in general lots of solid engraved words will cost more that a few simple straight line cuts. The total cost for 4 angled stands [ see picture] came to about £27 which works out at £6.75 a unit.

There is a basis syntax check as part of the upload, but it is well worth taking their advice to print out your design on paper / card and try it before committing.

The only really annoying point for me was that I increased the size to make sure I could fit a Raspberry Pi below the LCD and 2 days later the A+ is announced which meant I could have made the whole thing smaller !

Posted in Uncategorized | Tagged , | Leave a comment

Pi and sounds

Spent some time having a playing with basic sounds on the Raspberry Pi this weekend. toiletThis is the first time I have done anything with audio since very early in the ‘life of pi’ when audio was somewhat temperamental. I am pleased to say it it was a much happier process this time around. Not wanting anything complicated I initially used some basic instructions from ‘Make:’ – http://makezine.com/projects/make-33/simple-soundboard/  . Which worked fine but Pygame seems to be a little fussy with which  ‘.wav’ files it will and will not accept, so I ended up using “os.system (aplay……)” which seems much more tolerant.

Just as a demo I linked in with last weeks post on PIR detectors, to play a flushing toilet effect every time someone walks into our home office – I suspect my wife will demand it’s prompt removal tomorrow morning ….

Worth mentioning to amplify the RPi’s output I am using a simple audio amp kit I purchased a while ago from Bitsbox – http://www.bitsbox.co.uk/index.php?main_page=product_info&cPath=280_283&products_id=2020 . Chiltern-20141102-00644

The amp was very quick to build and worked first time which is always a bonus. This work is part of an updated RSS reader project I am currently working on.


Posted in Uncategorized | Tagged , , | Leave a comment

Low cost motion detector for the RaspberryPi

motion1Spent this evening experimenting with a low cost PIR motion detector [HC-SR501], it is small – appox 2cm by 3cm and easily to find for just over £2 on ebay.

Connection is very simple just 3 wires, the device runs on 5V with a single 3.3V output pin which goes high when motion is detected – to be on the safe side I have connected to RPi via a 1K resistor. There are 2 pots to adjust sensitivity and how long the output stays high after motion is detected, together with a jumper that sets how the unit responds to continuous movement detection.

motion2

All worked fine first time, importantly Marmite one of cats jumped up onto the table at just the right time so I also know it will detect her, which was the stretch goal of the evening experimentations.  Marmite1

Currently I have a cat sensor based around the ‘picam’ code, see earlier pose – https://meanderingpi.wordpress.com/2014/04/05/cat-cam-mark-2/. This is fine in good light levels and avoids the need for additional hardware, but struggles in low light. The plan here is to set up the motion detector with the Pi NoIR to see what they get up to at night.

Sorry I have not been posting over the summer, with the longer nights I am going to try and post something every week going forward

Posted in Uncategorized | Tagged | Leave a comment

Pi B+ Arrived this Morning

Firstly sorry that I have not posted in a while, I has been busy with other things and working on a new bit of Pi related hardware – I hope to be able to talk a little more about this in a few weeks time.
Chiltern-20140715-00534But anyway big news yesterday with the announcement of the Raspberry Pi B+. I ordered one from Farnell which arrived this morning and I have to say it ticks just about all the boxes in terms of improved design while maintaining bacChiltern-20140715-00531k-compatibility for just about everything. That said the full size prototyping boards I have used in the past will not fit the B+ but that is for me only a minor problem.

My B+ top 10

  1. Off-board connections on just 2 sides  – this will make packaging much simpler
  2. 4 on board USB ports, with the option to run up to 1amp – no need for a separate hub
  3. Switching power on board regulator – saves a bit of power for battery applications
  4. Rounded board corners – I know it is silly but it make the Pi feel so much more tactile
  5. Sensibly arranged mounting holes -again this simplifies packaging
  6. No SD card sticking out – the move to a micro SD seems really sensible
  7. Combined analogue audio and video – much less intrusive for something I rarely use
  8. More IO – reduces the need to add a separate I2C port expander
  9. Same great low price – it is good to find something has not gone up in the last 2 years
  10. Good level of backwards compatibility – only one version of s/w for me to maintain
Posted in Uncategorized | Tagged | Leave a comment

My BitScope Micro Has Arrived

bistcope 05 picAfter short wait while it was couriered over from Australia my Bitscope micro has arrived. The Bitscope Micro is a low cost analyser and dual channel scope that interfaces via a USB port. There are a number of these in the market but what exited me about this one is that not only is the display s/w available on PC and MAC platforms, they have done a specific port for the Raspberry pi so for the cost of a RPI + $145 I now have a fully featured 2 channel oscilloscope and logic analyser. I checked it out first on a PC which was fine and then got it up and running on a Rpi. About the hardest bit of the whole installation was finding my way around the BitScope website to instructions ! – for the record the Rpi I had to hand was a very early 256M model B but it worked fine.Chiltern-20140425-00495

The Bitscope hardware also includes a basic waveform generator so getting something meaningful on the display took not time at all.

First impressions.

The hardware worked straight out of the box, no physical s/w is supplied but downloading and installing the DSO application on a windows 8 Machine was very straight forward. I will add another blog post when I have spent some time using the DSO and other applications in anger but the basis functionality is certainly intuitive.Chiltern-20140425-00491

In terms of getting it working on a Rpi there is a great set of instructions on the Bitscope site but [ and this may just be me ] I do feel they could make them a bit easier to find !

Not unsurprisingly the DSO application does use a lot of the system resources, that said I created a simple python program to toggle a GPIO line and this easily ran fast enough for me to ‘monitor’ it with the DSO application running.

Documentation

Very limited printed documentation is supplied with the Bitscope Micro, and frankly they might as well not have bothered at all give that the font used is far too small read comfortably   – but on the positive you can easily down load a complete set of documentation from the website

All in all I think this is a great product, I have only really scratched the surface with it so far and will post more in the future – there is a  new tab on the top level menu where I will try and capture anything useful I learn.Chiltern-20140425-00497

Check out the Bitscope website for more information
http://bitscope.com/


Posted in Uncategorized | Tagged , | Leave a comment